After wrapping up with the SSI-IMG format yesterday, I’ve been struggling to come up with what to blog about next. My brain isn’t quite ready to jump back into the PIC format. Then I got a message…
any chance of this amiga “.img” getting converted with your tool?
Would love to extract the bitmap of this splash screen.

And so the adventure begins. Just when I thought I was done with the SSI-IMG format.
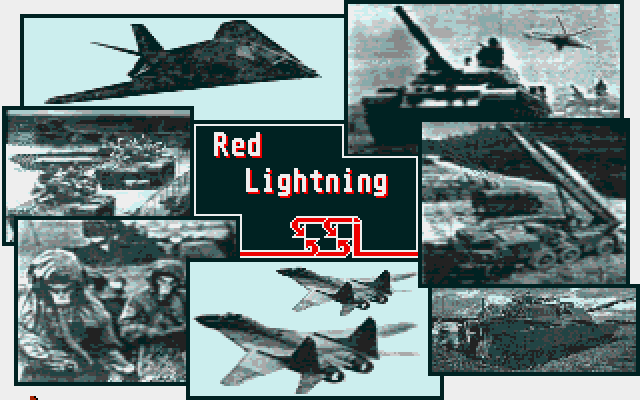
My first response was that it could take some work, as Amiga would be different again, just like CGA was from EGA. I asked what the resolution was, they weren’t immediately sure, initially responding with 640×400, but that wasn’t right based on the file size. So I did some quick research I determined the resolution was 320×200 or 320×240 depending on if it was NTSC or PAL, with up to 5 bits per pixel. I was sent the below image of what to expect. After a little more back and forth, I decided to take a crack at it.
With all that in hand, let’s Well that’s a start, let’s look at the file and see what we can figure out. First let’s look at the hex, as we always do.
File: RL-amiga.img  [32064 bytes]
Offset    x0 x1 x2 x3 x4 x5 x6 x7 x8 x9 xA xB xC xD xE xF  Decoded Text
0000000x: 00 00 00 00 00 00 00 00 00 00 00 00 00 00 00 00  · · · · · · · · · · · · · · · ·
0000001x: 00 00 00 00 00 0F FF FF FF FF FF FF FF FF FF FF  · · · · · · · · · · · · · · · ·
0000002x: FF FF FF FF FF FF FF 00 00 00 00 00 00 00 00 00  · · · · · · · · · · · · · · · ·
0000003x: 00 00 00 00 00 00 00 00 00 00 00 00 00 0F FF FF  · · · · · · · · · · · · · · · ·
Nothing jumped out in the data. It’s clearly not compressed. The size is odd at 32064 bytes. A 320×200 16 colour (4 bit) image would occupy 0nly 32000 bytes, if packed. This is exactly 64 bytes larger. So that would suggest this is a 320×200 image, at 4 bits. Now I do know that the Amiga used planar memory like EGA, so I expect planes and not linear values. I recently watched “Doom didn’t kill the Amiga…Wolfenstein 3D did” on YouTube, so had that bit of knowledge still in my head. (great video BTW, I highly recommend watching it) But with that extra 64 bytes? I wonder if they are some padding at the end of each plane like CGA, though it is a strange value. Let’s disable the sanity checks in our img2bmp code, and use our EGA deplaning code and find out.
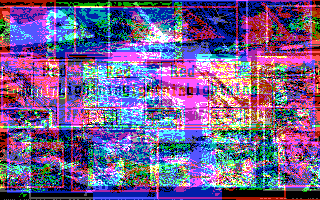
Very cyberpunk, but no, not what we’re looking for. But we can clearly see some image elements so we know we’re on the right track. Let’s try removing the last 64 bytes and see what we get.
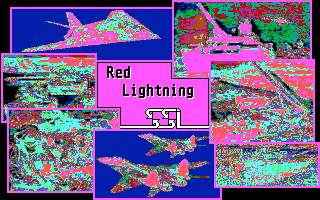
Well hot damn! We have an image! We don’t have the Amiga palette, but we have a freaking image. I also have no idea if I have the correct plane ordering, but without the palette it’s meaningless anyway. Now before removing those last 64 bytes, I did notice that they are not all 00 so there is still some data there. Possibly the palette? let’s take a look.
File: RL-amiga.img  [32064 bytes]
Offset    x0 x1 x2 x3 x4 x5 x6 x7 x8 x9 xA xB xC xD xE xF  Decoded Text
00007D0x: 0E EE 0C EE 0C CC 0A CC 0A AA 08 AA 08 88 06 88  · · · · · · · · · · · · · · · ·
00007D1x: 06 66 04 66 04 44 02 44 02 22 00 22 00 0A 0E 00  · f · f · D · D · " · " · · · ·
00007D2x: 00 00 00 00 00 00 00 00 00 00 00 00 00 00 00 00  · · · · · · · · · · · · · · · ·
00007D3x: 00 00 00 00 00 00 00 00 00 00 00 00 00 00 00 00  · · · · · · · · · · · · · · · ·
A quick jog back to the wikipedia page and we see that the Amiga had a 12-bit RGB DAC (4,096-colors total). Looking at what we see above, the first 32 of the 64 bytes appear to have data, and if we look at them as 16bit pairs, we can see that the high nibble of each is 0 (remember the Amiga was big endian, not little endian like we have been working with), and that would be 12 bits for the rest, so maybe this is the palette, it is 16 entries and we have 4 planes. And since the Amiga supports up to 5 planes, which would be 32 palette entries, that would explain why we have 64 bytes, but only half are used. Let’s whip up some code to read the 16 palette entries in and use those in our BMP.
        // read in the palette, 2 bytes per entry, 4 bits per colour
        for(int p = 0; p < 16; p++) {
            uint16_t entry = img.data[img.pos++];
            entry <<= 8;
            entry |= img.data[img.pos++];

            uint8_t comp = entry & 0x0f;
            img_pal[p].b = comp << 4;
            entry >>= 4;
            comp = entry & 0x0f;
            img_pal[p].g = comp << 4;
            entry >>= 4;
            comp = entry & 0x0f;
            img_pal[p].r = comp << 4;
        }
With that simple bit of code, let’s see what we get.
Damn, that’s really close, but from the reference image was saw, the SSI logo should be red. So looks like we have our red and blue components swapped. Could have been much worse. So let’s swap those and try again.

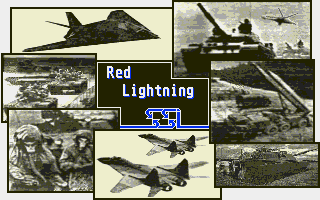
And there we have it! Fully decoded Amiga image, in under 60 minutes. (I’m not kidding, the request came in at 7:43pm, I got to it and made my initial response at 8:04pm, and sent the final image at 8:49pm, it’s taken me twice that long to blog about it lol) It ended up being pretty easy this time. I think we even have the bit/plane ordering correct, just based on what I see in the image, and what I see in the palette data. Even if it’s not “correct” it’s good enough to work for our purposes.
Now I did make one other change to get slightly better palette values. I did proper scaling using floating point instead of just shifting shown earlier. (divide original value by max, multiply that by 255) You get a slightly brighter image when you do. (the images here used that updated code, when I went back to regenerate and save for the blog my attempts)
            double comp = entry & 0x0f;
            comp /= 15;
            comp *= 255;
            if(comp > 255.0) comp = 255;
            img_pal[p].b = comp;
How’s that for a 60 minute solve? No I’m not putting a 60 minute delivery guarantee on future solves! We got lucky and this one turned out to be pretty simple, and allowed us to reuse a lot of what we already had in place. I know I’ll probably end up doing it anyway, but I’m not planning on writing a Amiga-IMG encoder at this stage. I will however update the code in my github code repo to add in the ability to convert an Amiga IMG into a BMP.

Leave a comment